Showing posts with label Tuesday. Show all posts

Tuesday, October 5, 2010

An Apple a Day...

So, I don't know if y'all have figured it out by now, but I'm no gourmet chef. I know, I know, you're surprised. This week I try my hand at baking a pie.

FROM SCRATCH!

I have never, ever done this. Have I made pies? Sure. We're the crusts pre-packaged and frozen in their pans already? Of course.

This time, I did it all, and I made a rather delicious apple pie. It all starts here:


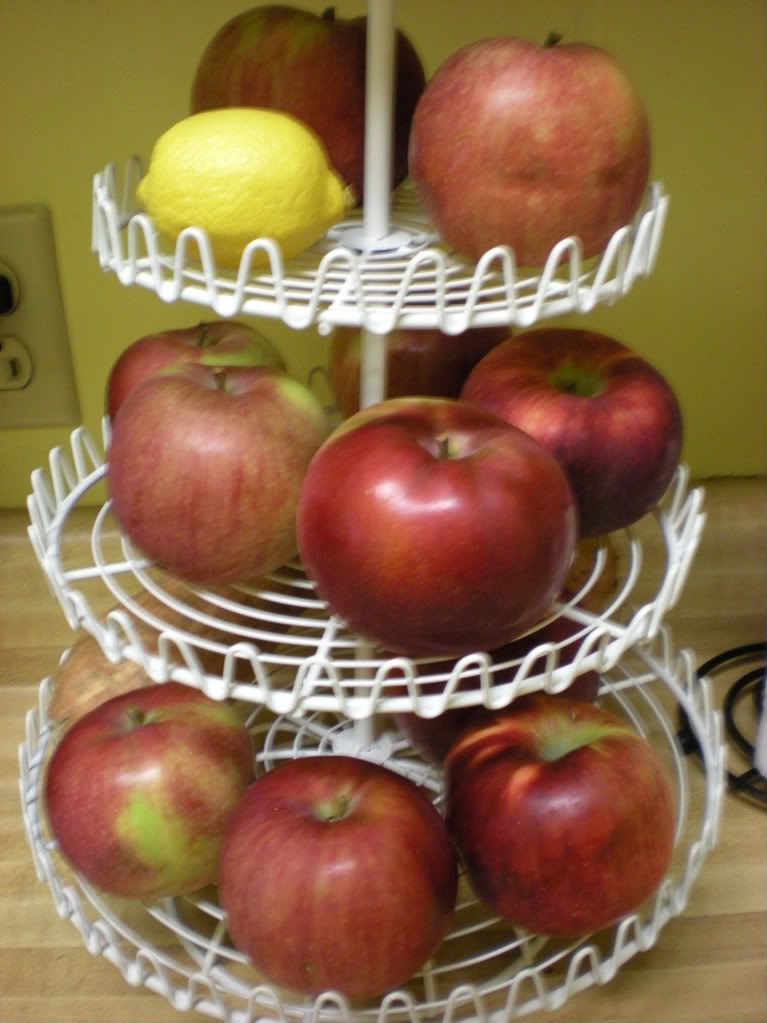
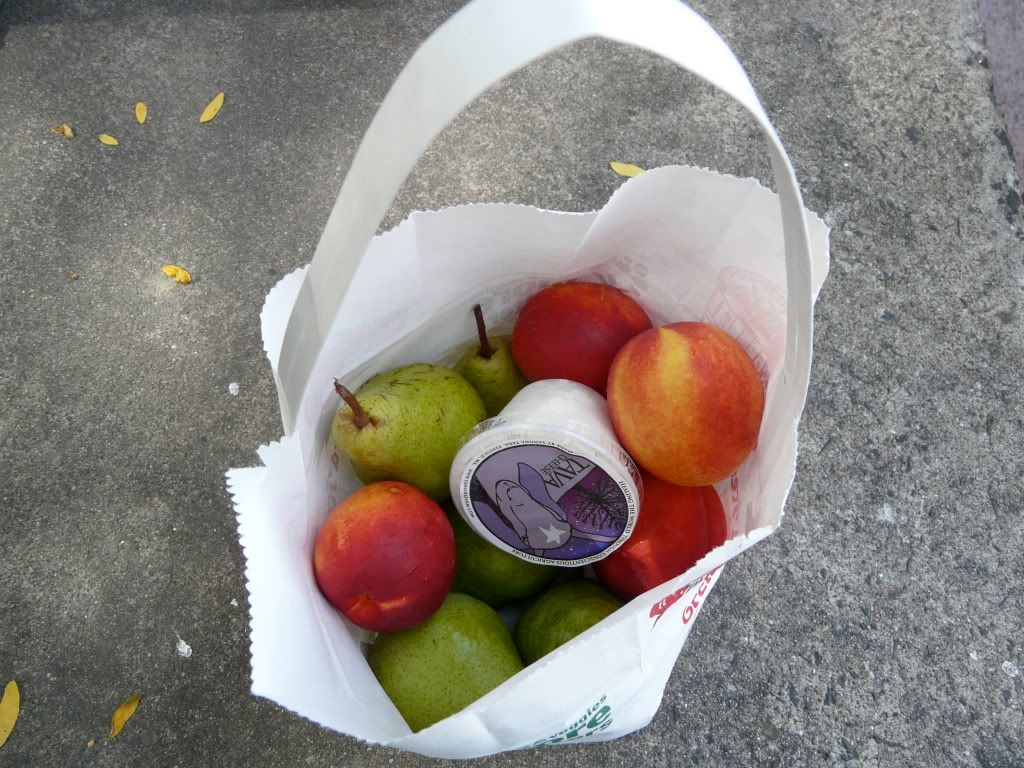
Well, really, you make the crust first, as I learned today when I finally read the directions, but the apples were how this all started. Sass and I live in total opposite sides of the country, so we have a lot of different food choices. Something normal for me would be very unusual for her. Like, Sass goes to the orchard and picks apples. Yeah, I don't do that. Last week, she mailed me some of those apples, and then she sent me this.

Ingredients
Makes one 9-inch pie
· 3 tablespoons all-purpose flour, plus more for work surface
· 1 to 1 1/2 recipes Deep Dish Pate Brisee
· 1 large egg yolk
· 1 tablespoon heavy cream
· 3 pounds assorted apples, such as Macoun, Granny Smith, cortland, Jonagold, or empire, peeled, cored, and cut into 1/4-inch-thick slices
· 2 tablespoons freshly squeezed lemon juice
· 1/4 cup granulated sugar
· 1 teaspoon ground cinnamon
· 1/4 teaspoon ground nutmeg
· 1/8 teaspoon salt
· 1 tablespoon unsalted butter, cut into small pieces
· Sanding sugar, for sprinkling
Directions
1. On a lightly floured work surface, roll out one pate brisee disc into a 13-inch round about 1/8 inch thick. Fit dough into a 9-inch pie plate. With a sharp paring knife, trim dough flush with the rim. Freeze again until firm, at least 30 minutes.
2. Roll out remaining 2 discs of pate brisee to about 1/8 inch thick. Place on a parchment-lined baking sheet, and freeze until firm, at least 30 minutes. Remove from freezer; using a 2 1/4-inch leaf-shaped cutter, cut out about 65 leaves and place them in a single layer on baking sheet. Place in refrigerator until firm.
3. Preheat oven to 400 degrees. In a small bowl, whisk together egg yolk and heavy cream; set aside. In a large bowl, toss the apples with the lemon juice, granulated sugar, flour, cinnamon, nutmeg, and salt. Remove pie shell from freezer, and fill with apple mixture. Dot with butter.
4. Remove leaves from refrigerator, and score with a paring knife to make veins. Lightly brush the edge of the pie shell with water. Brush the bottom of each leaf with water; beginning with the outside edge, arrange leaves in a slightly overlapping ring. Repeat to form another ring slightly overlapping the first. Continue until only a small circle of filling is left uncovered in the center.
5. Carefully brush the top of the leaves and pie edge with the reserved egg wash, and sprinkle generously with sanding sugar. Freeze or refrigerate until firm, at least 30 minutes.
6. Place pie plate on a baking sheet, and bake until crust just begins to brown, about 20 minutes. Reduce oven temperature to 350 degrees and continue baking until crust is golden brown and juices are bubbling, 35 to 45 minutes. If the crust begins to get too dark, drape a piece of aluminum foil over the top. Transfer to a wire rack to cool.


BRISEE (Fancy word for DOUGH)
Ingredients
Makes enough for one 12-inch deep-dish pie
· 3 3/4 cups all-purpose flour
· 1 1/2 teaspoons salt
· 1 1/2 teaspoons sugar
· 3/4 pound (3 sticks) unsalted butter, cut into small pieces
· 3/4 cup ice water
Directions
1. Place flour, salt, and sugar in a food processor; process to combine. Add butter, and process until mixture resembles coarse meal, about 10 seconds. Add 1/2 to 3/4 cup ice water in a slow, steady stream through the feed tube with the machine running, just until the dough holds together. Do not process for more than 30 seconds. Test dough by squeezing a small amount together; if it is still crumbly, add a bit more water.
2. Turn dough out onto a piece of plastic wrap. Press into a flattened circle, and wrap in the plastic. Refrigerate for at least 1 hour before using.


Read more at Marthastewart.com

Well, y'all know I always have some mishap. This time, I couldn't work my new food processor because I'm dumb. My friend got it to work like THAT. Anywho, I couldn't work it, so I had to use a fork and my hand to mix in the butter... it took awhile. Then, you have to roll it out. That's when I realized I don't have a rolling pin. Doh.


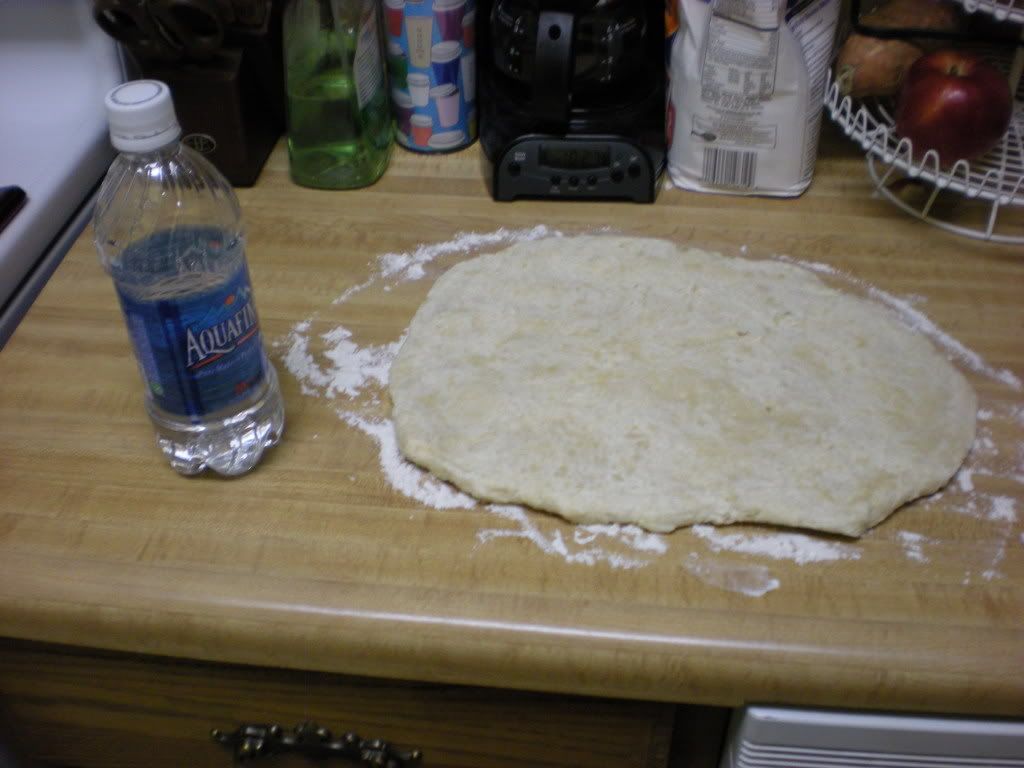
You see that water bottle? Well, I considered using that as a rolling pin. lol. Yeah, um, not my smartest idea. It definitely didn't work.

So I just smooshed it out on my countertop and then wrapped it in saran wrap and put it in the refrigerator for an hour. During that hour, I cut and peeled seven apples and rushed around like a mad woman to finish cleaning my house before my guests came over for pie. I also, during that time, texted everyone so they would come thirty minutes later.

Once that hour was up, I smooshed it even flatter and put it in the pan. I cut around the excess and then smooshed that all up together and tried my best to flatten it (I was not very successful - you'll see). I then had to stick it back in the freezer for thirty minutes. It was about this time I was starting to really not like making crust from scratch. I don't want to do things in steps with waiting in the middle. I want it all done right away.

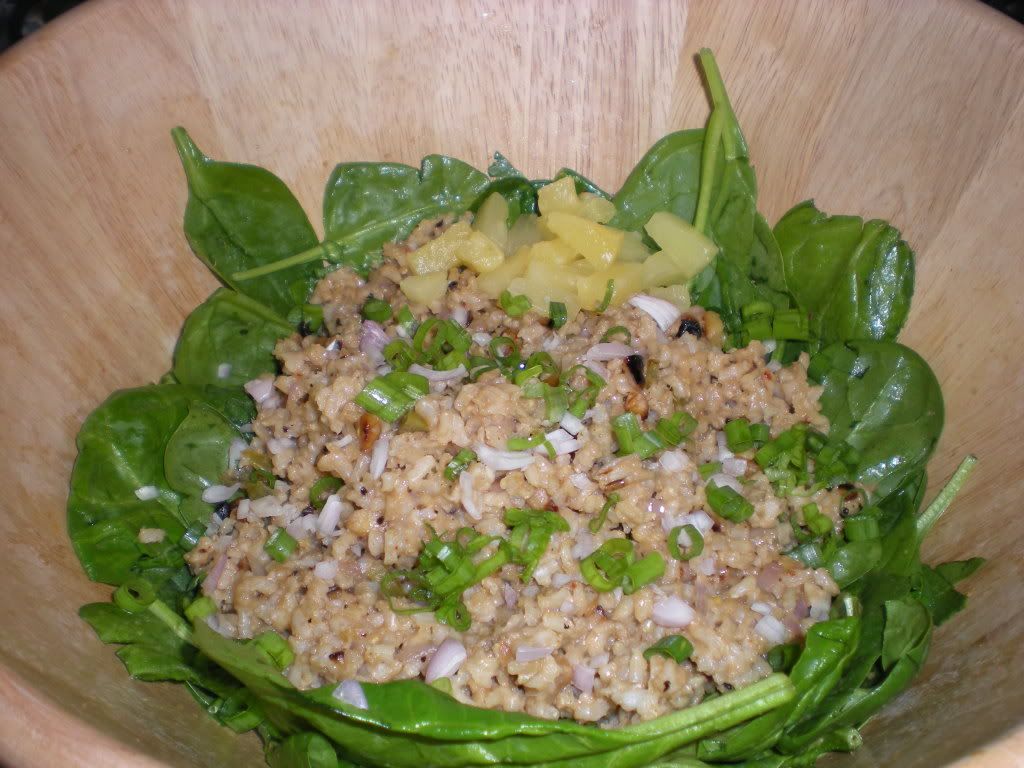
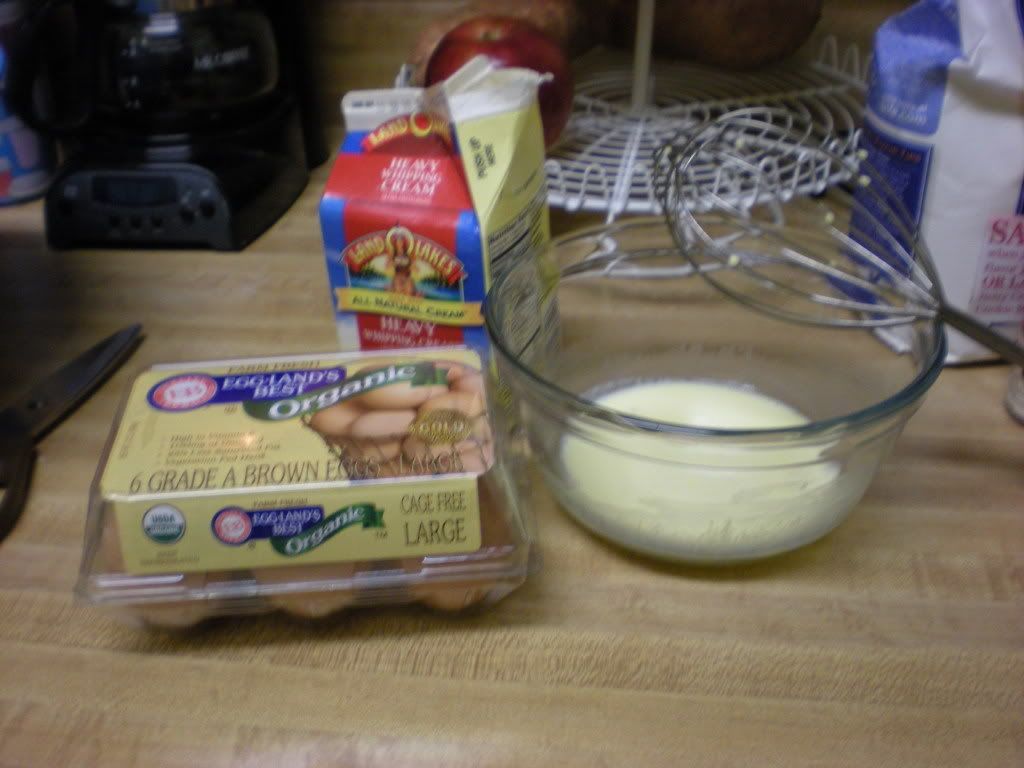
I took that time though to mix up the stuff that goes on the inside of the pie.


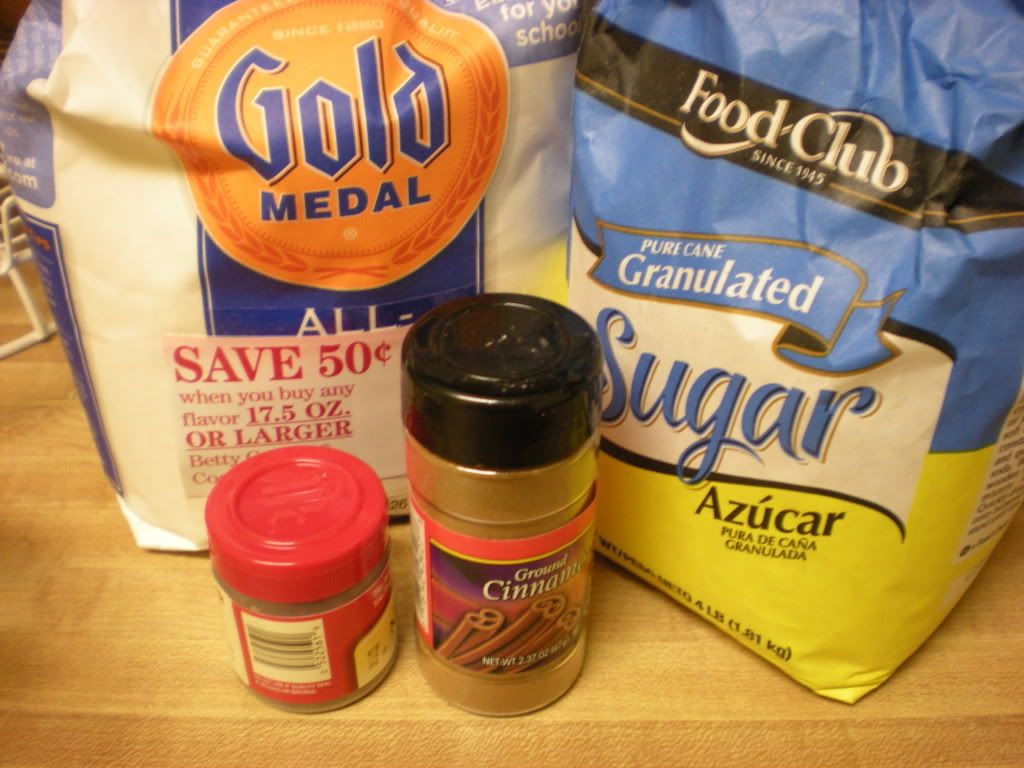
These ingredients plus the lemon in the first picture with the apples make this:


Then, I also had to make an egg yolk, whipping cream combo to put on top of the pie. It was easy, but I really need to find a better way to get the yolk out of an egg. I ended up with it in my hand. Don't ask me how that happened. I'm still not sure.


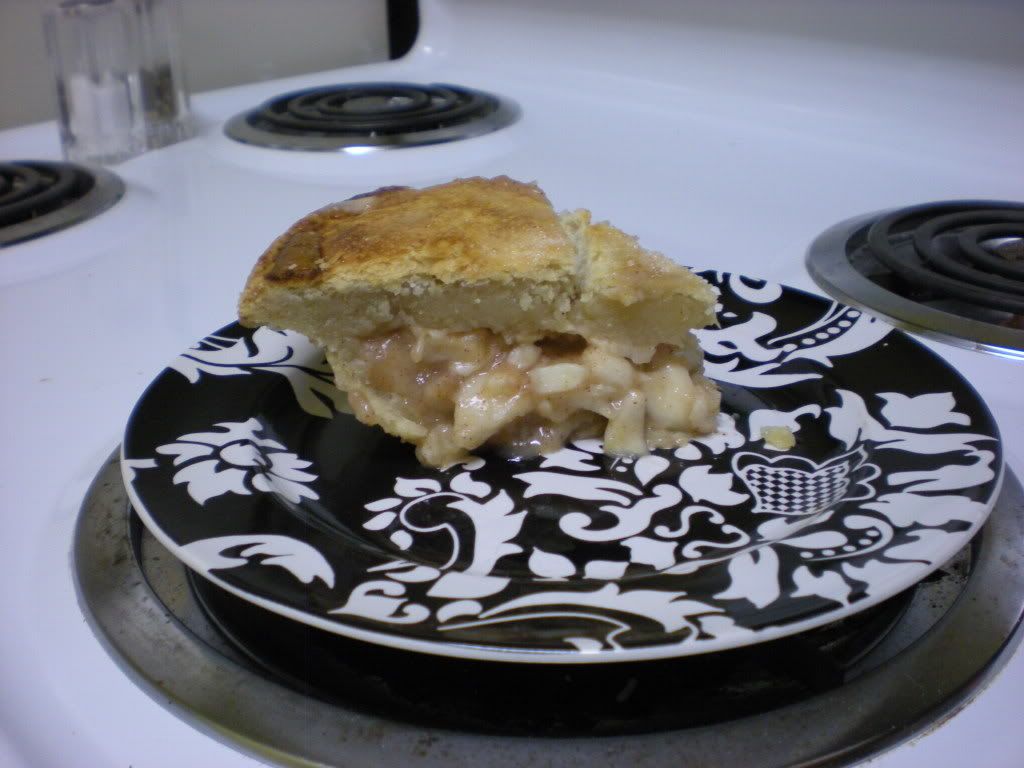
Then, I had to take the dough out of the freezer and fill the pie pan up. Easy enough. The problem now was that my top layer of crust was really thick, but it was too cold to smoosh further with my hands, and I didn't have enough time to wait. So I just put it on top, cut off the excess and mushed it a bit around the edge. I remembered some slashes in it from the picture, so I cut it with a knife. The directions above are actually for that criss-cross strip crust thing, and I was not all about that. Simplicity is key. For real. I rubbed the egg yolk and whipping cream mixture on top of the pie (because I don't have a brush) and then stuck it in the oven.

And, somehow, I didn't burn it.


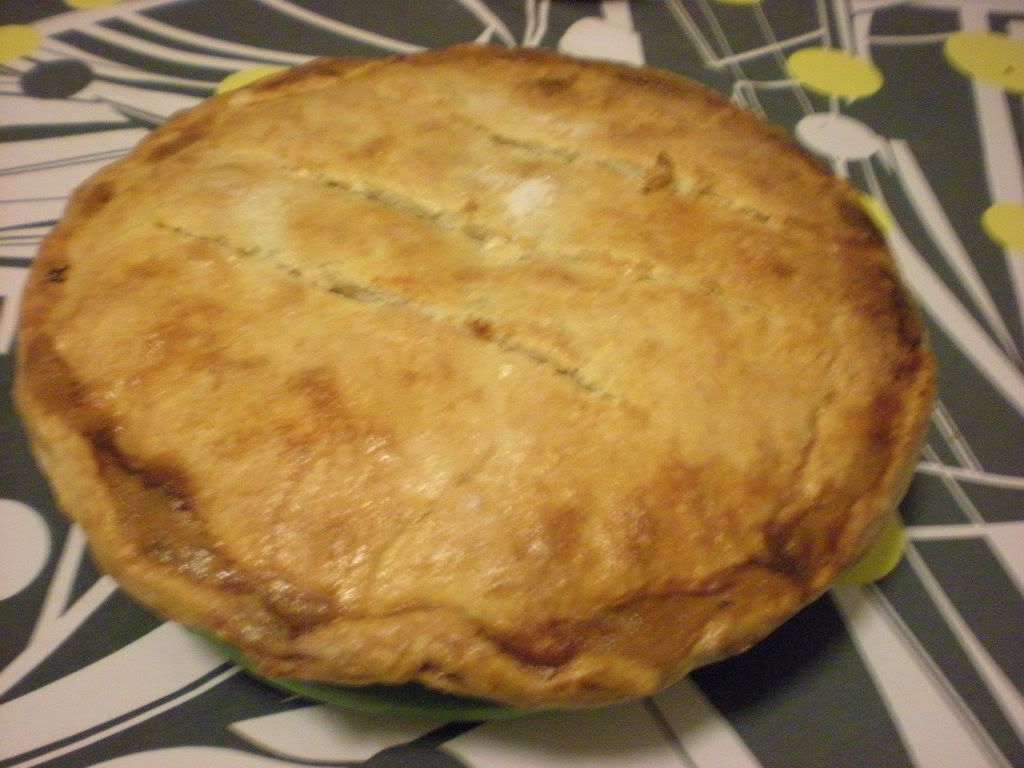
It's definitely not winning any pie contests based on looks, but it smelled and tasted delicious. Everyone enjoyed it very much. We had it with french vanilla ice cream, though, Sass swears I have to try it with cheddar cheese. I totally forgot to buy cheese at the store, though, so I will have to save that weird combo for next time.

The pie was cooked to perfection, the crust flaky and brown, the apples soft and juicy. The only thing wrong was that damn top crust. It was comical thick in some places of the pie.


Despite the crazy crust, this was very, very good. I think Martha and I need to give ourselves a big pat on the back. 

Tuesday, September 28, 2010

For Whom the Bell Pepper Tolls

When Snark sent me this recipe, it couldn’t have come at a better time. I had leftover roasted chicken and some peppers, and needed something interesting and tasty to do with them. Okay, I might have said, “Hey, Snark. I have leftover roasted chicken and peppers. Make sure your recipe to me this week uses those. kthxbai.”


So, she sent me this recipe for stuffed peppers. I’m 99% certain she just google “chicken, peppers” but either way, I’m more than happy with the results.


I’ll be honest - I used the recipe as a blueprint, and kind of built it up on my own. I had one leftover pepper, but needed to get more and headed over to the local food co-op with the kiddo. We left with 5 different colored peppers.


I also put up some brown rice, even though the recipe didn’t call for it. Whenever I’ve eaten a stuffed vegetable (pepper, cabbage, etc...) there is always rice involved, so I decided to include some here. While the rice was cooking I worked on the rest of the filling. Now, this recipe says to chop up onion and garlic and stuff it raw into the pepper. That didn’t really sit well with me, so I ended up sauteing it a bit first. Also, when I sliced the tops off the peppers, I chopped them up and added it to the pan - no sense in wasting perfectly good pepper!


I added some tomato sauce and shredded chicken to the onion/garlic/pepper mixture and then went to get my paprika. That’s when I realized I was all out. I’m really bad at ensuring I have all my ingredients before settling in to cook. So, I improvised and tossed in some chili powder. By that time, the rice was done so I added that to the man and mixed it all up. I stuffed three different peppers and then sprinkled some cheese over them (instead of mixing it all throughout) and then popped them into the oven to bake.


They came out beautifully.


And, what’s more...they were super tasty as well. It was just the kiddo and me for dinner, and he gave it a raving review (despite 15 minutes later claiming that the onion in the dish caused his back to hurt. We later discovered that it was actually caused by the rug burn his uncle gave him during an exciting game of “dino-ball.” yeah. I still go by his earlier review of “Yum!”).


So, even though I totally bastardized the actual recipe, I’m okay with it, because the stuffed peppers I ended up making we’re pretty damn delicious. 


*Blog title "borrowed" from Snark.

Tuesday, September 21, 2010

Aloha Means Never Having to Clean Up the Kitchen...

It's Tuesday again, so that means we're back with another delicious recipe and the woes or successes of the overall cooking experience. I say that, because it was a success in the end (the meal was yum) but the process of getting there was very woeful.

Very Woeful Indeed.

I'm just going to come right out and say it. I am a klutsy person. If there is a crack in the sidewalk, I will find it and trip. If you throw something to me, I will drop it. If you hand something to me, there is a strong possibility that I'll drop it. If I'm pouring something, it will spill. If I'm eating, I will get food on my clothes. And so on and so forth. That is why cooking is hazardous for me. I don't mind cooking, I like to do it even, but I'm better off with recipes that seem like they were complicated, but were actually only like two steps. 

This week Sass gave me the task of making Pineapple Rice.

Pineapple Rice Recipe
You can use extra-virgin coconut oil in the dressing instead of the macadamia, olive or sunflower oils if you like. In fact, it's a great choice, particularly if you'll be serving the rice hot. It solidifies at room temperature. Follow the same instructions, just don't be alarmed by the white flecks in the dressing after you puree it. They will disappear upon heating.
1/3 cup macadamia oil, olive oil, or sunflower oil
2 teaspoons toasted sesame oil
1/4 cup (fresh or canned) all-natural 100% pineapple juice
1 garlic clove
1/4 teaspoon red pepper flakes
2 tablespoons soy sauce (or shoyu)
1 cup pineapple, cut into chunks
2 teaspoons freshly grated ginger
1/4 teaspoon fine grain sea salt
4 handfuls of mizuna, watercress, or arugula
2 1/2 cups cooked brown rice, room temperature
4 green onions, thinly sliced
3 shallots, peeled and thinly sliced
1 cup cashews, roasted/toasted and chopped
1/2 small serrano chile, seeded and deveined, and minced (optional)
4 ounces seitan, cut into little bits and pan-fried (optional)
Start by making the dressing. Combine the oil, sesame oil, pineapple juice, garlic, red pepper flakes, soy sauce, fresh pineapple, ginger, and salt in a blender or food processor. Puree until smooth. Transfer to a small saucepan, and gently warm just before serving, don't simmer or boil.
In an extra-large bowl toss the mizuna with a generous splash of the dressing. Arrange it on a platter (as a bed for the rice)
You can serve the rice portion of this recipe room temperature or hot - Wayne really loved the hot version, and so did I. In the same bowl you used to toss the greens, or in an extra large skillet over medium heat, combine the rice, most of the onions, shallots, cashews and serrano chile, and seitan. Add about half of the dressing and toss well. If you are serving the rice hot, saute it in the pan until it is heated throughout. Taste, and adjust with more dressing if needed. Spoon the rice over the greens and finish with any remaining onions, shallots, cashews, and seitan.
Serves 2- 4, main vs. side.
Inspired by and (heavily) adapted from a recipe in the Summer 2009Edible Hawaiian Islands publication.
As you can see, there are more than two steps. You're probably telling yourself right now, "Self, there doesn't appear to be that many steps, what is wrong with this girl?" Well, I'll tell you what is wrong with me, how it all went down and explain myself right now.

First things first, I looked over the recipe and realized that I didn't have most of the ingredients. I had brown rice and EVOO on hand at my house. That's it. I didn't even have a blender. I've been meaning to buy one, so I figured now was as good as time as any. So, I headed to Target after work yesterday to get everything I needed. When I was perusing the vegetables, I realized I had no idea what mizuna, watercress or even arugula looked like. I knew I had heard of arugula, but that was about it. I looked again and again at the leafy greens, and there was nothing to be found. That should have been the first sign.

After a second pass of the produce section, I gave up and decided to use my spinach I had at the house. I then headed over to the oils and spices to stock up on some new flavors. I'm always surprised at their prices, but it was fine since I figure I will definitely use them again. Then, I crossed the store to check out the blenders, and I found one on sale which is always nice.


I finally got home with all of my supplies, and I decided to get down to cooking. I have limited space in my apartment, and the kitchen does not have a lot of counter space. It doesn't take much to clutter it completely, and I try to clean as you go to make it easier, but last night it was like I was doing everything at once except for cleaning.

The recipe says to make the dressing first, but I was immediately chopping shallots (I now know what they are - go me) and garlic. I just thought it would be best to get the chopping out of the way. That though just took up my counter space. I also started cooking my brown Success rice which I'm glad I have because I wouldn't have been able to handle anything BUT bag rice last night. Then, I had to get my blender out of the box, cut it out of all those ridiculous ties and bags.

I hope you can see how the mess just kept growing and growing. Then, apparently I pushed one of the buttons on the blender at some point, so when I plugged it in, it started up, whirring loudly and scaring the shit out of me. After making sure the blender was indeed off, I put it together and started making the dressing. This wasn't difficult. I did accidentally not follow directions because I put like a 1/3 of a cup of pineapple instead of 1 cup. (I later commented to Sass that it didn't have the sweetness I thought it would, not realizing my own blunder)

Anywho, I puree'ed, and it was all good. Then, I tried to take the blender off the base to pour into a small saucepan. Somehow, I loosened the glass from the blade instead of the whole thing from the base, and much to my dismay, my sauce started to leak right out the bottom. With a few choice curses, I righty tighty'ed it back up, but then I could not, prob because of my EVOO fingers, could not get it loose. I had to tip the whole blender over to pour the sauce in the pan. There was a lot of drippage. That task was finished, though, so I let out a sigh of relief and a look of annoyance directed at the blender.

I then turned to the rice itself which warranted toasted cashews. I had decided at the store that I was going to use walnuts since I had them at my house, so I did. I chopped them and then put them in the pan with the heat on super low, but since I'm slow, they started to get a little too toasty, if you know what I mean.

I was burning my nuts up.

I finally got all the other ingredients in the pan (including a few pickled jalapenos I chopped up in place of a serrano chile because I'm classy like that) with the dressing, and I knew it was going to be okay. After I had poured ALL of the dressing on the rice, I looked back at the directions to see it said half of it, season to taste. Well, I just had to hope that I was all about full flavor. Everything was finally going my way then, well, until I knocked the glass of jalapenos over, spilling pickled pepper juice all over my counter. That was fun. I swear, super klutz here.

FINALLY, everything was done, and I was ready to arrange for a pretty picture. I poured some rice on top of the spinach, sprinkled the rest of the shallots, remembered last minute to cut up the green onions so I sprinkled them on top and then got fancy with a pineapple garnish (It wasn't a garnish really since I ate those pineapple pieces, but just go with it.) This is the final product.


Looks delicious, right? It was. All of my hard work paid off, and really, for a normal person, I don't think this recipe would be difficult at all. Remind me to tell you the time I made a chocolate cake with icing so hard, you couldn't penetrate it with a butcher's knife. That's a story for another day...

So, then, I had this lovely presentation, but I hadn't invited anyone over to share it with me. I wasn't going to let the beauty go to waste, though, so I ate dinner out of the giant salad bowl, sitting on the floor in my underwear. Don't judge me.

Obviously, I only ate a small portion of the rice, but I did eat most of the spinach. It was really good, and I was pretty proud of myself. I'm going to bring the rest of the rice to share with my parents at their house tonight. I told my mother she just has to make everything else. After I was through eating directly from the giant salad bowl like a savage, I went back into the kitchen to put the rest of the rice away, and this is what I found.


What you can't see is the spilled jalapeno juice, but you can see the rest of my mess I had to clean up. If you take this step by step and clean as you go, it would be easy to cook, easy to clean, but I can never do anything the easy way.

I do recommend this rice. It was tasty, healthy and would be fantastic as a side dish to a lot of meals. Get out and make it yourself and then let us know your experience. Please when you share, though, mention how you accidentally leaned on the cutting board, making the ingredients fly into the air, smattering garlic and shallots against the wall and all in your hair and then you slipped on some spilled EEVO and fell on the floor. Basically, make me feel better about all my spaziness. Mkay? Thanks!

Tuesday, September 14, 2010

Salad Win

When Snark passed on a recipe for salad for this Tuesday's assignment, I was actually really thrilled. Most people would be like... "You don't win friend's with salad!" and while that's true in some circumstances, in this case  - it's the total opposite. 

My friends and I pride ourselves on the creative and delicious things we can do with some greens, veggies and homemade dressing. There is always at least one, if not two, large salads at our weekly potluck gatherings, and it's always exciting to see what toppings/dressings accompany it. 

I hosted a Rosh Hashannah dinner last week, and it was the perfect opportunity to test out Snark's recipe. As I looked it over, I made a few edits of my own, omitting the green onions (not huge raw onion fans over here) and substituting goat cheese for the Roquefort. Everything else stayed the same.

Ingredients

  • 1 head leaf lettuce, torn into bite-size pieces
  • 3 pears - peeled, cored and chopped
  • 5 ounces Roquefort cheese, crumbled
  • 1 avocado - peeled, pitted, and diced
  • 1/2 cup thinly sliced green onions
  • 1/4 cup white sugar
  • 1/2 cup pecans
  • 1/3 cup olive oil
  • 3 tablespoons red wine vinegar
  • 1 1/2 teaspoons white sugar
  • 1 1/2 teaspoons prepared mustard
  • 1 clove garlic, chopped
  • 1/2 teaspoon salt
  • fresh ground black pepper to taste

Directions

  1. In a skillet over medium heat, stir 1/4 cup of sugar together with the pecans. Continue stirring gently until sugar has melted and caramelized the pecans. Carefully transfer nuts onto waxed paper. Allow to cool, and break into pieces.
  2. For the dressing, blend oil, vinegar, 1 1/2 teaspoons sugar, mustard, chopped garlic, salt, and pepper.
  3. In a large serving bowl, layer lettuce, pears, blue cheese, avocado, and green onions. Pour dressing over salad, sprinkle with pecans, and serve.

Luckily, The previous weekend I had some good friends visit me and bring with them a gift of salad greens. It was huge...I'm talking pillowcase huge.


The greens looked positively scrumptious and I couldn't wait to use them in this salad. I just needed to get the rest of the ingredients. A trip to our local farmer's market provided me with the goat cheese and pears, both local products. I love when I'm able to use the bounty of the area in my meal...you know, the whole farm to table movement is pretty awesome and I'm lucky to live in an area that really promotes it. 

I may have bought some nectarines as well. nom.

On the day of our big dinner, I assembled all the ingredients and plunged ahead in the long standing tradition of salad making. I made the dressing first, and I have to say that this dressing was fantastic. The garlic added a bite of spice to it, which complemented the sweeter aspects to the salad and it wasn't too oily. I'll definitely be using this dressing on future salads.

I'm not sure why more people don't make their own dressing. Easy & delicious!
My next step was sugaring the pecans. I followed the directions and added the sugar and nuts to a pan over medium heat. Then I waited...and waited...and waited. My nuts weren't getting all sticky. The sugar remained a solid and I wondered if I was doing something wrong. I double checked the recpe to see if I had accidentally omitted something and I even sent a text to Snark wondering what was wrong. Snark had chosen that day to leave her phone uncharged, so with no answer from her, I had to figure it out on my own. 
I thought I smelled the nuts burning, so I shut the heat off. I figured I could just have salty nuts without the caramel. Then, because I had nothing better to do, I put the heat back on and waited...and waited...and waited. Finally after almost thirty minutes the sugar began melting and coating the nuts. I was overjoyed! Maybe my organic hippie sugar takes longer to hat up, who knows. But it would have been helpful if the original recipe had some sort of time description for this part. 
I'm glad I saw it through because the candied nuts were perfection on the salad. Sweet, and with a delicious crunch, they added another level of flavor and texture to the salad.
Once the nuts were out of the way, the actual salad itself was easy peasy to assemble. When I served it to my friends later that evening I was blown away at how much everyone seemed to love it. I even received the accolade of "this is your best salad yet!" - which among my friends is high praise indeed. I absolutely loved this salad, and it will definitely enter the rotation of dinnertime starters at our house. Perhaps the best show of appreciation came from my husband, who is not really known for his love of salad: he had two helpings!  

Tuesday, September 7, 2010

What the Heck Is Strata?

On this dreary Tuesday morning, I'm here to talk about food, and that is never a bad thing. Sass and I decided that we were going to exchange recipes each week, and this week it was my turn to be the chef. Well, more like, Chef Boyardee with my skills. Julia Child I am not.

Sass linked me to this site: http://smittenkitchen.com/

Honestly, I'm glad she did because not only did I get excited about the recipe she wanted me to try my hands at, but the site in itself is super cute and looks to have some really tasty recipes. I perused on my own for a bit, and I may have discovered a few things I'm going to have to try.

For this Tasty Tuesday, we are talking about breakfast and brunch. I love breakfast foods. I admit it. Give me your pancakes and english muffins. Yes, I would like a waffle and some turkey bacon. Oh, your scrambling eggs? Sure, scramble me up one. So, um, yeah, you get what I'm saying. I'm a breakfast gal, so I was pretty excited when Sass linked me here: http://smittenkitchen.com/2009/12/spinach-and-cheese-strata/ to this recipe:

Spinach and Cheese Strata

Serves 6 to 8


1 (10 ounce) package frozen spinach, thawed, squeeze of all excess liquid, and chopped
1 1/2 cups finely chopped onion (1 large)

3 tablespoons unsalted butter
1 teaspoon salt
1/2 teaspoon black pepper
1/4 teaspoon freshly grated nutmeg
8 cups cubed French or Italian bread in 1-inch cubes (1/2 lb)
6 ounces coarsely grated Gruyère (2 cups)
2 ounces finely grated parmesan (1 cup)
2 3/4 cups milk
9 large eggs
2 tablespoons Dijon mustard


Sauté onion in butter in a large, heavy skillet over medium heat until soft, about 5 minutes. Add 1/2 teaspoon salt, 1/4 teaspoon pepper and nutmeg and continue cooking for one minute. Stir in spinach, remove from heat and set aside.


Spread one third of the bread cubes in a well-buttered 3-quart gratin dish or other ceramic baking dish. Top with one-third of bread cubes,one-third of spinach mixture and one-third of each cheese. Repeat layering twice with remaining bread, spinach and cheese.


Whisk eggs, milk, mustard and remaining 1/2 teaspoon salt and 1/4 teaspoon pepper together in a large bowl and pour evenly over strata. Cover with plastic wrap and chill strata for eat least 8 hours or up to a day.


The next day, let it stand at room temperature for 30 minutes while preheating the oven to 350°F. Bake strata, uncovered, in middle of oven until puffed, golden brown, and cooked through, 45 to 55 minutes. Let stand 5 minutes before serving.

So, with this recipe in my hand, I decided a Labor Day brunch was in order. The ingredients are easy enough to come by with the exception of Gruyere cheese. I finally found it at one of the Gucci Brookshires, as we call it, in the Fancy Cheese area. I then discovered that it was $13 for a triangle of cheese!! Needless to say, I immediately put that cheese back and wandered over to the Kraft. I had googled Gruyere before to figure out what it tasted like, and I took a stab that Swiss was my best bet. After the fact, Sass told me that she also uses Swiss, so I felt a little victorious over the expensive cheese. I also added some crumbles of a colby jack and hoped for the best.

This past weekend was a busy one for me. I co-hosted a 1970's skating retro engagement party on Sunday, so I was a little worried about the fact that I had to make the Strata the night before. I'm nothing if not a procrastinator, so I was nervous I would run out of time. Sunday at about 2, I started to prepare. It was easy to do. My only issue was I had an out of control onion. That mother was strong! My sister and friend were commenting on the smell and their watering eyes from the chopping to the sauteing. I wasn't that affected until I put my contacts in. Next time, I'll wash my hands three or four times before doing that again.

Monday morning, I took out of the fridge and then popped it in about an hour before my friends were supposed to show up. It was smelling delicious and looking all golden brown, so I took out after about forty-five minutes. I feel like a dunce because I didn't snap a pic before this was eaten, but let's just say it looked pretty similar to the picture on the site. ;) Then, we dug in. The typical response was, "This is really good." I also got a, "This is really, really good," so it was definitely a hit. People also went back for seconds, so that is definite proof that this a tasty breakfast meal. My only issue is that I might not have baked it long enough because the bread was still a little gooey in the middle. No one seemed to mind, but the corner pieces were definitely the first to go. All in all, this was delish, and both Sass and I highly recommend it.

Try it out and let us know how it goes for you!